Not Your Momma’s Split Pea Soup

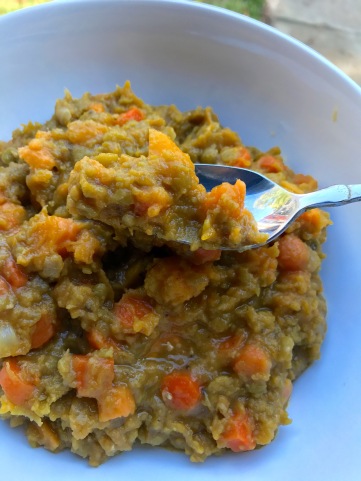
As a child, split pea soup was a meal I dreaded eating; from its greenish brown, lackluster appearance to its overwhelming pork flavor, it reminded me of a soup that would be served at a nursing home – bland, mushy, and single noted.

As an adult, when I became more nutrition-conscious and exploratory with cooking, I vowed to revitalize split pea soup, giving it an appearance and flavor that would make it appealing to all ages! With 16 grams of protein per cup, split peas are a great source of protein on their own. Since I have never been much of a pork fan, I therefore vowed to remove it from the dish altogether – its not necessary as a protein source, and I think it detracts from the subtle, rich taste of this soup.

IMG_0468.jpg

My dog, Duke, making an appearance in the background!

The secret to this split pea soup recipe is cooking it low and slow. This allows for the peas to soften and almost entirely lose their shape, creating a thick, hearty base for the other vegetables. The butternut squash is what really makes this soup as delicious as it is. As the squash cooks in with the peas, it starts to disintegrate and blend into the split pea base, giving the soup a subtly sweet flavor and creamier texture.

Although the overall cooking time is long for this soup, don’t shy away from it because of that! It is a soup you can “set and forget”, perfect to let cook while you prepare Sunday dinner or bake meals for the week ahead. This soup is also a great starter for parties or dish to bring to a get-together – it’s gluten-free, vegan, nut-free and kid-friendly – so it is sure to meet the needs of those with common food restrictions and please even the pickiest of eaters. Enjoy!

Cook time: 80 minutes 

IMG_0476 (1).jpg

Ingredients:

  • 1 yellow onion
  • 1 C dried split peas
  • 3 C vegetable stock
  • 2 celery sticks
  • 3 large carrots
  • 1 medium sweet potato (~ 1 1/2 C diced)
  • 1 small butternut squash (1 1/2 C diced)
  • 1 T olive oil
  • 1/2 tsp salt, + more to taste
  • Pepper, to taste

Directions:

  1. Finely dice the yellow onion.
  2. In a large pot, heat the olive oil and diced onion over medium high heat until golden brown.
  3. Add the split peas and vegetable stock to the pot and leave on medium high heat.
  4. Once the pot starts to boil, reduce to low heat, cover, and let simmer. Set a timer for 35 minutes.
  5. While the peas cook, dice the celery and squash (1 1/2 cups worth), and then peel and dice the sweet potato and carrots.
  6. Once the timer goes off, add the remaining diced vegetables and 1/2 tsp salt to the pot.
  7. Cover and let simmer on low for an additional 40-45 minutes, until all vegetables are tender and the peas are disintegrated?
  8. Remove from heat and let cool for 10-15 minutes.
  9. Taste, and add additional salt and pepper, to taste.
  10. Serve warm and enjoy!

Makes 3-4 meal-sized servings.

Easy black bean and corn salsa

Lately the weather has been feeling like winter has arrived here in DC, but I’m not ready to give in, so I’m throwing it back to warmer weather days and outdoor cookout season with this easy black bean and corn salsa. I was worried tomato season had passed without getting this recipe out to all of you, but last weekend I was able to find some beautiful fresh tomatoes at my local farmers market! Fresh tomatoes, rather than canned, are a must for me in handmade salsas, and I like to get a few in different color hues to add an extra level of complexity to both the taste and visual presentation.

This salsa comes together in less than 20 minutes, and its a major crowd pleaser! I always bring it to group get-togethers and work functions, especially if I don’t know people’s food preferences well – I mean, who doesn’t like salsa?! The fresh cilantro is really what throws this salsa over the edge flavor-wise, so don’t skimp by using cilantro seasoning in place of the real thing, and feel free to add more if you like a big cilantro flavor punch.

This salsa is also delicious as a topping on tacos, mixed into eggs or an omelet, and even eaten by the spoonful! The recipe makes a large, “party size” batch; if you are making this for just one or two people, be prepared to have enough for multiple meals worth. You could also easily freeze half of the recipe to thaw out for a later date. The salsa will likely have more liquid if frozen then re-thawed, but the flavor will be the same!


IMG_4233

Ingredients:

  • 1 can black beans, no salt added
  • 2 T white vinegar
  • 1 large ear of corn
  • 2-3 fresh medium-sized tomatoes
  • 1/4 of a red onion
  • 1 lime
  • 1/2 tsp salt, plus more to taste
  • Handful of cilantro (~1/4 C packed when chopped)
  • Pepper, to taste
  • Dash of cayenne pepper (omit for mild salsa)

Directions:

  1. Bring a pot of water to boil, then add the ear of corn.
  2. Reduce the heat to medium-high, and let the corn cook for about 10 minutes, or until tender.
  3. Remove the corn from the water and set aside on a dry paper towel to cool.
  4. Drain and rise the can of black beans.
  5. Finely dice the fresh tomatoes and red onion.
  6. In a medium-sized bowl, add the diced tomatoes, onion, and the black beans.
  7. Zest the lime over the bowl, then cut the lime in half and squeeze its juice into the bowl as well.
  8. Wash and finely chop a large handful of cilantro, then add to the bowl.
  9. Add the vinegar, salt, pepper, and cayenne to the bowl, and stir until well combined.
  10. Taste and add additional salt and/or pepper to desired flavor.
  11. Cover bowl and place in fridge for at least 1 hour.
  12. Serve chilled and enjoy!

Makes a party-size serving for about 10-12 people.

IMG_4236

Roasted Acorn Squash with Wild Rice, Chicken Sausage, & Cherry Stuffing

Nothing says November like foods that remain you of Thanksgiving, right? Thanksgiving is my absolute favorite holiday, so I am always trying to find ways to make it feel like Thanksgiving extends beyond just one day (and one meal)! This stuffed squash brings out some of my favorite flavors of fall and is the perfect way to get yourself in the mood for Thanksgiving. From the tender, sweet acorn squash to the hearty mix of wild rice, mushrooms, and chicken sausage topped off with a crumbling of soft goat cheese, this meal is a humble nod to the many complex flavors of a Thanksgiving meal. But the real game changer, the hidden gem of the stuffing? Dried cherries!

IMG_0452

I discovered dried cherries as I was looking for a dried fruit that would give the same subtle sweet and tart combination you get from dried cranberries, but without all the added sugar. Did you know that a significant amount of the sugar in dried cranberries comes from added sugar (rather than from the berry’s own natural sugars)? Think about it – would you want to take a bite out of a raw cranberry? No, they’re too tart! To cut that tartness, you have to add sugar, which also reduces their nutritional value. Added sugars provide a lot of calories with little to no nutritional value. I prefer to skip the added sugars and opt for an alternative that utilizes only the fruit’s natural sugars for sweetness – hence why this recipe calls for dried cherries instead! Not sure where to find these in your supermarket? You can buy them on Amazon and have them delivered!

This stuffed squash lends itself to a cozy fall date night in, accompanied with a mild, nutty glass of wine. Snuggling by the fire is an optional addition that’s sure to make the dish taste even better. Cooking for one? This recipe makes two servings, but is easy to pack away for a delicious lunch or dinner the next day. I hope this dish gives you all the warm, cozy feelings of fall!

FullSizeRender

Ingredients:

  • 1 medium acorn squash
  • 1/2 C long grain wild rice
  • 1 C low-sodium chicken or vegetable stock
  • 1/2 a yellow onion
  • 8 oz. baby bella mushrooms
  • 2 roasted garlic chicken sausages*
  • 2 large handfuls (~3 cups) of kale
  • 1/4 C unsweetened, dried cherries
  • 1/4 C balsamic vinegar
  • 1 T EVOO
  • 1 tsp minced garlic
  • 1/4 tsp salt + more to taste
  • pepper, to taste
  • goat cheese (optional, for topping)
  • pepitas (optional, for topping)

*can sub for any flavor chicken sausage or other sausage you prefer. I have used sweet Italian chicken sausages for this recipe before and loved that too!

Directions:

  1. To a small pot, add the wild rice and stock.
  2. Heat on high until boiling, then cover the pot and reduce to simmer for — minutes.
  3. Preheat oven to 400 degrees F.
  4. Cut squash in half lengthwise, and use a spoon to scoop out the seeds.
  5. Spray each half of the squash with cooking spray, or lightly drizzle olive oil
  6. Sprinkle a dash of salt and pepper onto each half of the squash.
  7. Place the squash halves in the oven and let roast for 30-40 minutes, or until tender when poked with a fork.
  8. Finely dice the yellow onion and mushrooms.
  9. Heat a medium-sized skillet to medium-high heat.
  10. Add the olive oil and let it heat for about one minute, then add the diced onion and garlic.
  11. Let the onions cook on medium-high until golden brown, stirring often.
  12. Once browned, add in the mushrooms and half of the balsamic vinegar (1/8 C), turn down to medium heat, and let cook for another 5 minutes.
  13. Remove the outer casings from the chicken sausage, then crumble the sausages into the mushroom mixture.
  14. Roughly dice the kale and dried cherries, then add both to the skillet along with the additional balsamic vinegar.
  15. Cook for an additional 3-4 minutes, then remove from heat and set aside.
  16. When the rice has fully cooked, add the rice and remaining balsamic vinegar to the skillet and stir until well combined.
  17. Once tender, remove the squash halves from the oven.
  18. Fill each squash half with the rice stuffing. You may have some stuffing left over after the squash is filled, depending on the size of your squash. Luckily the stuffing is delicious on its own as well 🙂
  19. Return the stuffed squash halves to the oven for 10 minutes.
  20. Top with crumbled goat cheese and roasted pumpkin seeds (pepitas)

Makes 2 meal-sized portions.

Curried Mustard Chicken Thighs

Does anyone else have days where you just crave a juicy piece of chicken? Most weeks, I tend to cook like a vegetarian, but sometimes I just crave chicken. Not the plain, dry, white meat chicken you can get from a cheap salad bar. I’m talking tender, flavorful, dark meat chicken that makes you question why anyone would ever be vegetarian. When that craving hits, this is the recipe I turn to.

The first thing we need to clear the air about is that juicy and flavorful meat does NOT mean it’s unhealthy for you or significantly higher in fat. You can enjoy your chicken and not bust your diet, I promise! Yes breast meat is slightly lower in calories and fat than dark thigh meat, but both are lower in calories and fat per ounce than red meats. I much prefer the taste of dark meat, so when I am cooking a dish like this where the meat is the feature of the meal, I opt to use skinless dark meat and simply trim off any excess fat before marinating. As always, just watch your portion size.

The secret to this chicken recipe’s melt-in-your-mouth tenderness? Greek yogurt. Top that off with a harmonious blend of curry, mustard, and maple syrup, and you’ve got a flavorful, simple way to spice up your next barbecue or family dinner.

As the fall weather starts to roll in, I like to pair my curried mustard chicken with tri-colored roasted carrots and purple potatoes. But this chicken marinade is versatile enough to go well with any vegetable and starch, no matter what the season. Give this recipe a try, and let me know what you decide to pair it with!

IMG_0292

Ingredients:

  • 6-8 skinless chicken thighs (approx. 2lbs)
  • 3T nonfat, plain Greek yogurt
  • 1T stone-ground mustard
  • 1T Dijon mustard
  • 1 1/2 tsp curry powder
  • 1T + 1tsp low sodium soy sauce (GF if have an allergy)
  • 1 1/2 tsp maple syrup
  • 1/4 tsp salt
  • 1 T olive oil
  • Dash of cayenne seasoning

Directions:

  1. Trim excess fat from chicken thighs, and then set aside.
  2. In a small bowl, combine all other ingredients and stir until well combined.
  3. Place the trimmed thighs into a large ziplock bag and pour over the marinade mixture.
  4. Once the ziplock is securely closed, lightly shake the bag until the thighs are all well coated in marinade.
  5. Set ziplock bag aside in the refrigerator overnight (for optimal flavor), or for at least an hour.
  6. When you are ready to serve the chicken, heat a stovetop skillet or large pan to medium-high heat.
  7. Cook the thighs on the grill for 8-10 minutes, flipping halfway.
  8. Enjoy!

Makes 4-6 servings.

Kate’s Simple, Every Day Pancake Recipe

For the past few weeks, I have woken up on Saturday mornings with a serious craving for pancakes. Like many people, my weekday mornings are way too hectic to consider making something like pancakes that take more time to prepare, and often I am eating at the office (which lets face it, indulging in pancakes at your desk is just NOT the same). Weekend mornings are my chance to take a little more time to make breakfast and be more crafty.

With my Saturdays often packed with fun activities or chores, however, I don’t have time to be weighed down by a heavy breakfast; many store-bought mixes leave you feeling like you need to crawl back into bed to sleep off a food coma. Packed with whole grains and fiber, these will leave you feel satisfied, energized, and ready to take on whatever your weekend has in store for you.

IMG_0273

The best part about these pancakes? They’re made with ingredients easily found in most people’s pantry, and they are incredibly versatile! Feeling a little indulgent? Sprinkle in some chocolate chips for a sweet treat. Looking for a sweet and tangy twist? Add a splash of lemon juice instead of water to the batter then scatter some blueberries in each pancake. The combinations are endless if you use this simple pancake recipe as a base!

Ingredients:

  • 1 1/2 cup oats
  • 2 bananas
  • 1 egg + 1 egg white
  • 1/4 cup greek yogurt
  • 2 tsp baking powder
  • 1/2 tsp cinnamon
  • pinch of salt
  • 1/2 T maple syrup
  • splash of water

Directions:

  1. In a large bowl, slightly mash the bananas.
  2. Add all of the remaining ingredients to the bowl, and use a hand blender or stand mixer to blend into a thick batter. If you prefer a more uniform batter with less oat texture, transfer all ingredients to a regular blender instead and blend until smooth.
  3. Heat a griddle (or large frying pan) to medium-high heat and grease the pan with your preferred oil or butter.
  4. Once the griddle is warm, pour or scoop the batter onto the griddle to form the individual pancakes, using about 1/3 cup of the batter for each pancake.
  5. When you see bubbles start to form around the edge of each pancake, sprinkle in your chocolate chips, blueberries, or other topping, if desired.
  6. Flip the pancakes and let cook for an additional 4-5 minutes, or until both sides are golden brown.
  7. Repeat this process until all the batter is used up! This recipe yields 8-10 pancakes.

Note: This recipe was created to serve 2 people. If you are cooking for one, however, you can easily cut the recipe in half (omit the additional egg white, not the full egg). Even if I am just making this recipe for myself, however, I like to make the full recipe and put half the pancakes into a ziplock bag in the fridge or freezer for later — they are delicious reheated too! You can also easily scale up this recipe to feed a larger family or to be the ultimate host at your next brunch get together!

IMG_0271

Pumpkin Cake with Creamy Maple Frosting

The start of September means fall is officially here, and nothing says fall like…PUMPKIN!  Pumpkin offers that creamy, cozy, comforting feel that we so crave as the chilly fall weather starts to roll in; pumpkin makes you want to cuddle up under a blanket with a good book next to a warm fire. If what I just described is how you feel every year as the cooler temperatures roll in, I have the perfect cake recipe for you! The original pumpkin cake recipe I am about to share has been passed down in my family for generations, but I have made substitutions and updated the recipe to reduce the guilt without sacrificing on flavor.

Growing up in New England, another key fall flavor was maple syrup. Maple and pumpkin together? All the Fall feels. Not to mention maple sugar is an unrefined sugar and therefore a better alternative to the classic table sugar used in the original recipe (and many other cake recipes). Maple sugar also has a lower glycemic index than table sugar, meaning it doesn’t cause such a rapid blood sugar spike then drop. The other secret ingredient in the frosting is another guilt-reducing swap: cottage cheese. I know, I know — it sounds crazy, but just trust me! Once you blend the frosting into a smooth texture, no one will ever know and it can be our little secret.

IMG_0204

This mouth-watering, flavorful pumpkin cake recipe makes a full sheet cake worth of cake, so it is perfect for any dinner party or other fall function. However, sometimes we don’t want a special occasion to be the only excuse to bake a cake, and with this recipe, you can do so without feeling like you’ve over-indulged. I will leave you with a word of warning: you may need to exercise some serious self-control if left alone with this entire cake — it is THAT good!

Pro-tip: Bake the cake the night before you plan to serve it. The pumpkin flavor intensifies as it cools and sets, making it even more delicious the next day!

Cake Ingredients:

  • 3 eggs + 1 egg white
  • 3 C gluten-free flour
  • 1 C coconut sugar
  • 3/4 C maple syrup
  • 3/4 coconut oil
  • 3/4 non-fat greek yogurt
  • 1 can pumpkin puree (NOT pumpkin pie puree)
  • 1 1/2 tsp cinnamon
  • 2 tsp baking powder
  • 1 tsp baking soda
  • 1 tsp salt
  • 1 tsp vanilla

Frosting Ingredients:

  • 1 C cream cheese (lighten up by using reduced fat)
  • 1 C non-fat cottage cheese
  • 1/4 C coconut sugar
  • 1/4 C maple syrup
  • 1 tsp vanilla

Directions:

  1. Preheat the oven to 350 degrees F.
  2. In a large mixing bowl, combine all wet ingredients and mix with a stand mixer or hand blender until well blended.
  3. In a separate mixing bowl, add the dry ingredients together, stirring until well combined.
  4. Slowly add the dry ingredients to the wet mixture, stirring after each addition.
  5. Once all ingredients are combined, continue mixing until a thick, uniform batter forms.
  6. Grease a 9 x 13 inch cake pan.
  7. Pour the batter into the pan and use a spatula to evenly distribute the batter throughout the pan, creating a nearly flat top surface on the cake.
  8. Bake in the oven for 35-40 minutes, or until a toothpick inserted into the cake comes out clean.
  9. Set the cake aside to cool.
  10. In a small bowl, combine all the frosting ingredients.
  11. Use a stand mixer or transfer mixture to a blender to blend until the frosting ingredients form a creamy texture, free of any lumps.
  12. Once cake has cooled, pour the frosting over the cake and spread with a spatula until the frosting forms a smooth, even coating on the cake.
  13. Cut, serve, and enjoy all the delicious flavors of fall!


img_0201.jpg

Sweet, Hidden Veggie Breakfast Muffins

IMG_0031

Indulging in something that tastes delicious without sparking guilty feelings later? I’m in, especially when it involves breakfast (the best meal of the day)! These muffins do just that. Packed with vegetables (hence their name!), healthy fats, and natural protein and sugar sources, they taste decadent but will leave you feeling energized for the day instead of weighed down and lagging. So skip the pop tarts, and try these muffins out instead. Eating food that nourishes your body and makes you feel good doesn’t have to be boring and tasteless!

For me, the true test of whether I have created a successful healthy dish is when my friends or family eat it, without knowing the ingredients, and love it! These muffins are friend tested and approved – in fact, my friends went crazy over them and no one  believed they could be healthy with how they tasted. I count that as a major success!

Bring these muffins to your next brunch party for an easy crowd pleaser, bake up a batch for quick grab-and-go workday breakfasts, or throw these together for your kids as a subtle way to add more veggies into their diets! These “hidden veggie” muffins are sure to be a crowd pleaser.

Ingredients:

  • 1 cup grated carrots
  • 1 cup grated zucchini
  • 1/3 cup unsweetened applesauce (or 1 snack pack)
  • 3/4 cup whole-grain oats
  • 6 dates
  • 2 T almond milk*
  • 1 1/2 tsp cinnamon
  • 1 tsp pumpkin pie spice
  • 1/2 tsp salt
  • 1 cup chickpea flour
  • 2 1/2 tsp baking soda
  • 1 tsp lemon juice
  • 2 eggs + 1 egg white
  • 1/4 cup maple syrup
  • 1/3 cup coconut oil
  • 1 tsp vanilla extract
  • Almond butter (optional, for topping)

*sub almond milk with coconut milk for nut-free alternative

Directions:

  1. Preheat the oven to 350 degrees F.
  2. In a blender or food processor, blend the oats until they form a fine powder.
  3. Combine the dry ingredients in a medium sized bowl. Set aside.
  4. Again using a blender or food processor, blend the dates and almond milk into a thick paste.
  5. In a separate bowl, gently whisk the two eggs and egg white.
  6. To the eggs, add the date paste, applesauce, maple syrup, coconut oil, vanilla, and lemon juice. Stir until well combined.
  7. Fold the wet ingredients into the dry ingredients in three parts, stirring well after each addition until a thin batter forms.
  8. Add the grated zucchini and carrot to the batter, folding until well combined.
  9. Grease muffin tins with coconut oil, then fill each muffin cup about 3/4 full with batter.
  10. Bake at 350 degrees for 15 to 18 minutes, or until a toothpick inserted into the muffin comes out clean.

Makes about 12-14 muffins.

*Pro tip: My favorite way to serve these is warmed with a dollop of almond butter on top!

IMG_0028

Decadent Chocolate-Raspberry Banana Bread

     Banana bread is one of my favorite dishes to make in preparation for a busy week filled with on-the-go breakfasts. It also happens to be one of the first recipes I successfully put my own healthy twist on, creating a bread that provides sweetness from natural sources, cuts out the butter and oils laden in many bread recipes, and offers enough protein and complex carbs to keep you full until lunch. The key to this recipe? A few secret ingredients: applesauce provides a natural sweet flavor and contributes to the bread’s rich, moist texture; Greek yogurt offers a protein kick while also contributing to the rich texture; and quinoa flour adds protein and fiber to help prevent those mid-morning hunger pains.img_6009

Although this banana bread recipe is delicious with no added embellishments, I always like to stir in a few extra ingredients to add texture and create unique flavor profiles. Dark chocolate chips are a natural go-to addition for me, but recently I wanted to turn up the decadence level of my classic banana bread even more. My first thought? Raspberries. Raspberries and dark chocolate truly are a match made in heaven, and when combined with the rich, balanced flavors of this banana bread, create a bread I could not get enough of. I seriously had to portion it off just to prevent myself from eating the whole loaf in one sitting! It really is that delicious. Whether you are looking for a quick breakfast idea, healthy snack, or decadent dessert, this dark chocolate raspberry banana bread fits the bill!

img_5973

Ingredients:

  • 1 C quinoa flour
  • 1 C oats
  • 2 eggs + 1 egg white
  • 3 overripe bananas
  • 6-7 dates
  • 1/4 C unsweetened almond milk
  • 1/4 C unsweetened applesauce
  • 1/4 C non-fat Greek yogurt
  • 1 tsp vanilla extract
  • 2 T raw cane sugar (or other granulated sweetener)
  • 1 t baking soda
  • 1/2 t cinnamon
  • 1/2 t salt
  • 1 C fresh raspberries
  • 1/4 – 1/3 C dark chocolate chips

Directions:

  1. Preheat the oven to 375 degrees and grease a 9 x 5 inch bread pan (I prefer to use coconut oil spray to grease baking dishes).
  2. Blend oats in blender or food processor until they form a fine flour.
  3. In a mixing bowl, combine the blended oat flour with the other dry ingredients – quinoa flour, sugar, salt, baking soda, and cinnamon – and mix until evenly blended.
  4. Use a blender or food processor to blend the dates and almond milk until they form a smooth paste.
  5. In a separate large mixing bowl, mash the bananas until smooth in texture.
  6. To the mashed banana mixture, stir in the other wet ingredients – the date paste, vanilla extract, applesauce, Greek yogurt, and eggs. Mix until well combined.
  7. Fold in the dry ingredients into the wet ingredient mixing bowl in three parts, stirring well after each addition. Mix until the ingredients form a thick batter. Your batter may have some small clumps from the banana, but do not feel the need to over-beat the batter in an attempt to get rid of these clumps as they will just add a bit more texture to the bread.
  8. Gently fold in the raspberries and dark chocolate chips, and then pour the mixture into the greased baking pan.
  9. Bake at 375 degrees F for 45 minutes uncovered. Remove pan from the oven, cover with aluminum foil, and return to the oven for another 15-20 minutes until a toothpick inserted into the center of the loaf comes out clean, or only covered in melted chocolate. The aluminum foil will prevent the top of the bread from excessively browning, but I also recommend baking the bread on the lowest rack of the oven.
  10. Serve immediately or let the bread cool and store in the refrigerator until ready to eat.

Tip: I recommend portioning the bread into single serving slices and placing the slices along with a small paper towel into plastic bags to keep in the fridge for a quick breakfast or snack! I prefer my bread slices warmed in the oven for 30-45 seconds, but they are delicious chilled as well.


Cauli-Quinoa Fried Rice

Growing up, I can remember my excitement every time my mom came home and announced that we could order Chinese food for dinner. My request? Fried rice of course! I mean, who doesn’t love fried rice? I could not get enough of this rich dish, laden with soft egg and crisp veggies, and it always satisfied that salty, comfort food craving.

As an adult, I came to accept that I could not count the few veggies scattered throughout a mound of rice and fatty pork as a serving of vegetables, nor the dish as a whole a balanced meal. I therefore decided to make my own, lighter version of this childhood favorite. In this recipe, I use a blend of cauliflower and quinoa in place of rice to boost the nutrients and protein level of the dish, making it worthy to stand alone as a meal. I packed mine with peas, corn, red pepper, mushrooms, shredded carrots, and onions, but feel free to modify the type and quantity of vegetables used to match your own preferences. Recipes are only supposed to act as guides, and they’re always open to interpretation! Grated ginger gives this dish some tang while the soy sauce provides that classic hint of salt so necessary for fried rice. Top with a little sriracha for an added kick of heat!

I have served this dish multiple ways and enjoyed each version. I prefer mine either topped with a fried egg (the runny yolk provides a smooth buttery flavor that complements the saltiness of the soy sauce) or tossed with shelled edamame beans. This gives the rice an extra source of protein, making for a complete meal you can even prepare ahead of time and pack for lunches on a busy work week. This fried “rice” also acts as a great side dish for any Asian-style meat you may want to cook up! All the comfort and flavors of a classic fried rice dish without the post-indulgance guilt!

img_5925

Ingredients:

  • 1 C sliced white mushrooms
  • ½ C uncooked quinoa
  • 1 small yellow onion, diced
  • 2/3 C diced red pepper
  • 2 C riced cauliflower
  • ½ C shredded carrots
  • ½ C frozen peas
  • ½ C frozen corn
  • 2 tsp olvie oil
  • ½ tsp garlic
  • 2 tsp rice vinegar
  • 2 tsp sesame oil
  • 1 tsp grated ginger
  • 1 tsp black pepper
  • 2-3 T gluten free low-sodium soy sauce
  • Fresh chhopped cilantro, for garnish
  • sesame seeds for garnish (optional)
  • shelled edamame beans (optional)
  • fried egg (optional)

Directions:

  1. In a small pot, bring the quinoa and 1 cup of water to boil
  2. Once boiling, cover and reduce to simmer for 10 minutes until tender.
  3. In a separate pan, heat olive oil over medium high heat for 1-2 minutes.
  4. Add the diced onion to the pan and let it cook for about 3-4 minutes until translucent, stirring occasionally.
  5. Add the mushrooms, red pepper, garlic, and rice vinegar to the mixture, reduce heat to medium, and cook for 5-6 minutes.
  6. Reduce heat to low and add the cauliflower, carrots, frozen peas and corn to the pan.
  7. Stir in the soy sauce, sesame oil, ginger, and pepper.
  8. Allow the vegetable mixture to continue to cook over low heat for an additional 5 minutes, stirring occasionally.
  9. Turn off the heat and gently fold the quinoa into the vegetables until well combined.
  10. Optional: sprinkle in sesame seeds for extra texture and crunch or drizzle on sriracha for a little kick!
  11. Optional: add in some edamame beans or top with a fried egg for extra protein and an additional flavor component. A runny yolk always adds more flavor to a dish!

*Makes 2 meal-size servings or 4 servings as a side dish

Hearty Kale and White Bean Soup

Winter is soup season for me. Something about the cold weather elicits an internal need for a warm, hearty bowl of soup or stew. Why not warm your body from the inside out, right? Because I crave soup so often in the winter, I try to constantly vary the flavor profiles of soups I make to keep things new and exciting. My most recent soup was a hit, so I had to share it! This kale and white bean soup satisfies the desire for heartiness with the potato and cannellini beans which pairs well with the light, aromatic broth and earthy flavors of the carrots and kale. This soup is perfect for an afternoon cuddled in a blanket reading! As always, enjoy.

img_5880Ingredients:

  • 1 leek
  • 1 russet potato
  • 3 medium sized carrots
  • 1 32 oz container vegetable stock
  • 6-7 kale leaves
  • 1 can cannellini beans
  • 2 bay leaves
  • 1 tsp thyme
  • 1 tsp cracked black pepper
  • 1 tsp sea salt (plus more to taste)
  • 1/4 C white wine
  • 1 tsp crushed garlic

Directions:

  1. Roughly dice the leek by cutting in half lengthwise then chopping horizontally.
  2. Peel the potato and carrots and quarter the potato lengthwise
  3. Use a mandoline to slice both the potato and carrots into thin, bite-sized pieces.
  4. Thickly chop the kale leaves, being sure to remove and discard the thick stem of each leaf.
  5. Set aside all vegetables except for the leek.
  6. In a large pot, salute the garlic and diced leek for 2-3 minutes on medium high heat.
  7. Deglaze the pan with white wine, reduce to medium heat, and let cook until the wine evaporates.
  8. Add the carrots, potato, and veggie stock to the pan along with the bay leaves and seasonings.
  9. Bring the mixture to a boil then reduce to simmer for 40 minutes.
  10. After 40 minutes on low, add the beans and chopped kale and cook for another 10 or so minutes.
  11. Test the soup and add additional salt, pepper, or other seasoning to taste.

Note: Be sure to remove the bay leaves before serving!